Author: Ugur GUNCER
-
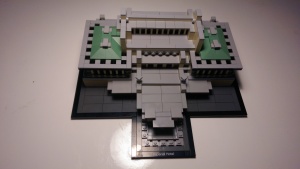
Lego Architect Imperial Hotel
Son gunlerde yapacak birsey ararken sevgili google bana lego yu onerdi 🙂
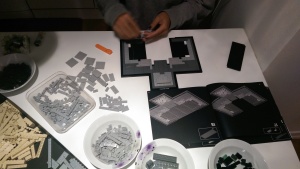
acaba hangi modeli yapsak da eglensek diye aklimdan gecirirken hem tarihini bildigimiz bir model buldum “Imperial Hotel” sans eseri Ankara da buldum ve hemen aldim. Kucuk bir supriz ile ortaya cikti lego kutusu. O kadar da itina ile posetleri acmamiza ragmen Lego tamamlandiginda eksik ve fazla parcalarla karsilastik, e rahatsiz insan olunca kafa durmuyor haydiii sokelim herseyi en bastan bir daha yapalim belki birseyi atlamisizdir dedik ve mincik mincik parcalar ile ugrasip sok-tak yapa yapa bisiler insaa ettik guzel oldu sanki

Lego Imperial Hotel 
Lego Imperial Hotel 
Lego Imperial Hotel 
Lego Imperial Hotel 
Lego Imperial Hotel 
Lego Imperial Hotel -
Apple Xserve Raid Fiber Channel Card Destegi
HP DL 180 G5 sunucuma elimde hali hazirda olan Apple Xserve Raid Storage i baglayip biraz fantezi yapmaya niyetlenmistimki Xserve ile birlikte gelen fiber channel kart i DL 180 G5 uzerine takacak bos pci slot bulmadim ve HP den fiber channel kart aramaya basladim Hp nin onerdigi kart HP StorageWorks FC1142SR 4Gb PCIe Host Bus Adapter (AE311A) ama sorun suydu acaba XServe bu kart ile calisacakmiydi uzun arastirmalar ve telefon gorusmelerim sonuc verdi.
Bilkom dan Gelen yanit su sekilde
Bilgiyi geldiği gibi sizile paylaşıyoruz.
Bu card ile Xserve RAID’i kullanabilir ama onemli olan fiber kablo baglantisi icin
kullanmasi gereken SFP/LC connector. Yani Xserve RAID ve bahsi gecen host bus
adaptorun fiber port yapilari farkli. Xserve RAID tarafina LC to SFP connector
gerekecektir.
Saygılarımızla,Ref: UC
Bilkom İletişim Merkezi
-
Asterisk LibSS7 Howto
This Howto has been contributed by Matthew Fredrickson – Author of LibSS7 at Digium
I have received many requests lately for a more current document
describing how to setup Asterisk with SS7 support. The following email
will hopefully suffice. The contents of this are also contained in the
README file in libss7 as well as inside Asterisk-trunk in the
doc/ss7.txt file.To Use:
=======
In order to use libss7, you must get at least the following versions of
Zaptel, libss7, and Asterisk (you might also want to get libpri):
Zaptel: 1.4.x
Asterisk: trunk
libss7: trunk (currently, there *only* is a trunk release).You must then do a `make; make install` in each of the directories that
you installed in the given order (Zaptel first, libss7 second, and
Asterisk last).NOTE: In order to check out the code, you must have the subversion
client installed. This is how to check them out from the public
subversion server.These are the commands you would type to install them:
`svn co http://svn.digium.com/svn/zaptel/branches/1.4 zaptel-1.4`
`cd zaptel-1.4`
`make; make install``svn co http://svn.digium.com/svn/libss7/trunk libss7-trunk`
`cd libss7-trunk`
`make; make install``svn co http://svn.digium.com/svn/asterisk/trunk asterisk-trunk`
`cd asterisk-trunk`
`./configure; make; make install;`This should build Zaptel, libss7, and Asterisk with SS7 support.
In the past, there was a special asterisk-ss7 branch to use which
contained the SS7 code. That code has been merged back into the trunk
version of Asterisk, and the old asterisk-ss7 branch has been deprecated
and removed. If you are still using the asterisk-ss7 branch, it will
not work against the current version of libss7, and you should switch to
asterisk-trunk instead.CONFIGURATION:
In zaptel.conf, your signalling channel(s) should be a “dchan” and your
bearers should be set as “bchan”.In the asterisk-ss7 branch, there is a sample zapata.conf that is
installed which contains sample configuration for setting up an E1 link.In brief, here is a simple ss7 linkset setup:
signalling = ss7
ss7type = itu ; or ansi if you are using an ANSI linklinkset = 1 ; Pick a number for your linkset identifier in
; zapata.confpointcode = 28 ; The decimal form of your point code. If you
; are using an
; ANSI linkset, you can use the xxx-xxx-xxx
notation for
; specifying your linkset pointcode.
adjpointcode = 2 ; The point code of the switch adjacent to your
; linksetdefaultdpc = 3 ; The point code of the switch you want to send
; your ISUP
; traffic to. A lot of the time, this is the
; same as your
; adjpointcode.; Now we configure our Bearer channels (CICs)
cicbeginswith = 1 ; Number to start counting the CICs from. So if
; Zap/1 to Zap/15 are CICs 1-15, you would set
; this to 1 before you
; declare channel=1-15channel=1-15 ; Use Zap/1-15 and assign them to CICs 1-15
cicbeginswith = 17 ; Now for Zap/17 to Zap/31, they are CICs 17-31
; so we initialize
; cicbeginswith to 17 before we declare those
; channelschannel = 17-31 ; This assigns CICs 17-31 to channels 17-31
signchan = 16 ; This is where you declare which Zap channel is
; your signalling
; channel. In our case it is Zap/16. You can
; add redundant
; signalling channels by adding additional
; sigchan= lines.; If we want an alternate redundant signalling channel add this
sigchan = 48 ; This would put two signalling channels
in our ; linkset, one at Zap/16 and one at Zap/48 which
; both would be used to send/receive
; ISUP traffic.; End of zapata.conf
This is how a basic linkset is setup. For more detailed zapata.conf SS7
config information as well as other options available for that file, see
the default zapata.conf that comes with the samples in asterisk. If you
would like, you can do a `make samples` in your asterisk-trunk directory
and it will install a sample zapata.conf for you that contains more
information about SS7 setup.